


Old family photos are more than just paper and ink. They are memories that connect you to your ancestors and your past. Over time, these physical prints can fade, crack, or get stained by water and dust. You might think those damaged images are lost forever, but modern technology offers a way to bring them back to life.
Restoring photos used to require hours of manual work in complex software. You had to learn how to use brushes, layers, and healing tools just to fix a single scratch. Now, artificial intelligence does the heavy lifting for you by analyzing the pixels and recreating missing details. You can use EzEnhancer AI Photo Restoration to automatically sharpen blurry faces and remove unwanted marks from your favorite vintage pictures.
This guide will walk you through the entire process of digital restoration. You will learn how to prepare your physical photos, how to use AI tools effectively, and how to save your results for future generations. By following these steps, you can turn a grainy, damaged snapshot into a clear and vibrant image that looks like it was taken yesterday.
Step 1: Digitizing Your Physical Family Photos
The first step in any restoration project is getting your physical photo into a digital format. The quality of your digital file determines how well the AI can perform its job. If you start with a blurry or low-resolution scan, the final result will not be as clear as it could be. Using EzEnhancer.ai allows you to fix these issues without needing professional editing skills.
You should use a flatbed scanner if you have one available. Set the scanner to at least 600 DPI (dots per inch) for standard photos. If the photo is very small, you might want to go up to 1200 DPI. This ensures that every tiny detail is captured. Clean the scanner glass with a soft cloth before you start to avoid adding new dust specks to the digital image.
If you do not have a scanner, you can use your smartphone camera. Place the photo in a well-lit area with natural, indirect light. Avoid using a flash because it creates a harsh glare on glossy photo paper. Hold your phone directly above the photo to prevent perspective distortion. There are many mobile apps designed specifically for scanning documents that can help keep the edges straight.
Step 2: Preparing the Family Photos Digital File
Once you have your digital image, take a moment to look at it closely. You might need to crop out the white borders of the scan or rotate the image so it is upright. Most basic photo viewers on your computer can handle these simple tasks. Save your file in a high-quality format like PNG or TIFF rather than a highly compressed JPG to keep the details sharp.
Check for any large pieces of debris that might have been on the scanner. If you see a giant hair or a piece of lint, it is better to re-scan the photo than to try and fix it later. The goal is to give the AI the cleanest possible starting point. A clean scan means the software can focus on fixing the actual damage in the photo rather than new mistakes made during the scanning process.
Step 3: Using AI to Repair Damage
Now you are ready to use the power of artificial intelligence. Upload your prepared file to the AI restoration tool. The software will look for common issues like cracks, scratches, and noise. It uses a deep learning model to understand what a healthy photo should look like and fills in the gaps where the paper has crumbled or faded.
The AI works by recognizing patterns. If a person’s eye is partially obscured by a scratch, the software looks at the surrounding pixels and other human faces it has studied to reconstruct the missing part. This process happens in seconds. You will see the scratches disappear and the grainy texture smooth out without losing the important details that make the person recognizable.
Step 4: Enhancing Clarity and Color
After the physical damage is repaired, you can focus on the visual quality. Many old photos suffer from motion blur or were taken with low-quality lenses. AI can upscale the image, which means it adds pixels to make the photo larger and sharper. This is especially helpful if you plan to print the restored photo in a larger size than the original.
Color is another area where AI shines. If you have a black and white photo, you can use a colorization feature to add realistic tones. The AI identifies objects like grass, sky, and skin to apply the correct colors. If your photo is already in color but has turned yellow or blue over time, the software can balance the levels to make the colors look natural again.
Step 5: Final Review and Saving
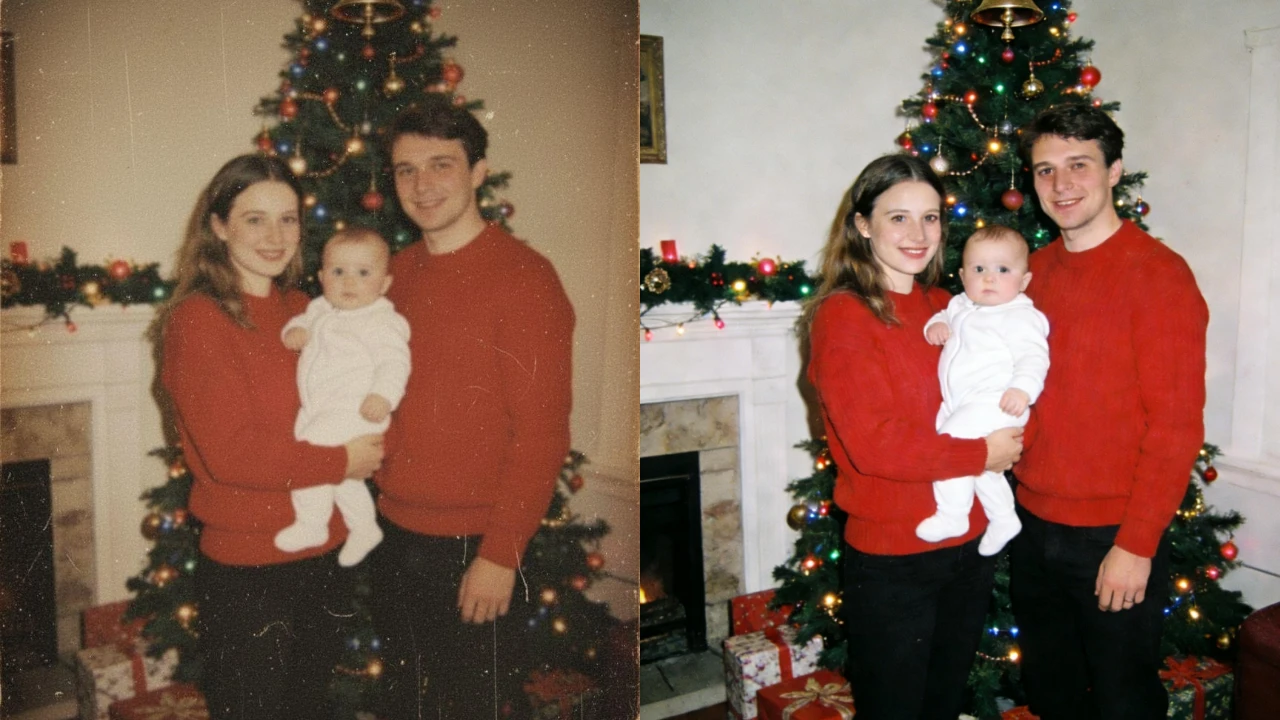
Look at the before and after images side by side. Check the eyes, hair, and background to make sure the AI did not create any strange artifacts. Sometimes AI can be a bit too aggressive, so you might want to adjust the strength of the filter if the tool allows it. You want the photo to look restored, not fake or plastic.
When you are happy with the result of the family photos, save the new version. It is a good idea to keep the original scan and the restored version in separate folders. Name the files clearly with dates and names of the people in the photos. This makes it easier for your family to organize the digital archive later on.
| Restoration Feature | What It Does |
| Scratch Removal | Fills in cracks and tears automatically |
| Face Sharpening | Makes blurry features look clear and crisp |
| Colorization | Adds natural colors to black and white shots |
| Denoising | Removes the grainy look from old film |
| Upscaling | Increases the size of the photo for printing |
Tips and Best Practices
To get the best results, always work with the highest resolution possible. AI needs data to work with, and more pixels mean more data. If you have the choice between a 2MB file and a 10MB file, always choose the larger one. You can always make a file smaller later, but you cannot easily add quality back to a small, compressed file.
Lighting is your best friend when digitizing. If you are using a camera, avoid shadows falling across the photo. Even lighting ensures that the AI does not mistake a shadow for a stain or a dark patch on the original print. If the photo is curled, use small weights on the corners or a piece of clean glass to hold it flat during the scan.
Be patient with the process. Some photos are heavily damaged and might require a few tries with different settings. If one AI model does not give you the look you want, try another one or adjust the brightness of your scan before uploading it again. Small changes in the input can lead to big changes in the output.
Common Mistakes to Avoid for Family Photos
One of the biggest mistakes people make is over-processing their photos. It is tempting to turn every setting up to the maximum to make the photo look brand new. However, this often results in a loss of character. Old family photos should still feel like they belong to their era. If you smooth the skin too much, the people might look like dolls instead of humans.
Another mistake is ignoring the background. Sometimes the AI focuses so much on the faces that the background becomes a blurry mess. Make sure to look at the trees, buildings, and furniture in the photo. These details provide context for the memory and are just as important as the people in the frame.
Do not forget to back up your work. Digital files can be lost if a hard drive fails or a cloud service changes. Store your restored photos in at least two different places. You might use an external hard drive and a cloud storage provider. Printing the restored photos is also a great way to ensure they survive for another hundred years.
Avoid using low-quality screenshots of photos. If someone sends you a picture of a photo via a messaging app, the quality is likely very low. Always ask for the original file or a high-resolution scan. Starting with a screenshot is like trying to build a house on a weak foundation. The AI will struggle to find enough detail to make a meaningful improvement.
Read Next
A few related pieces worth your time:
- How User Feedback Shaped the Citizen DJ Audio Tool
- Remote Gaming Without Limits: Download StarDesk in 2026
- Itilite vs Concur vs Navan vs TravelPerk: The CIO’s Guide to Travel Management Software in 2026
Conclusion
Restoring old family photos is a rewarding way to preserve your heritage. Technology has made it possible for anyone to fix damaged pictures without spending years learning complicated software. By scanning your photos carefully and using AI tools, you can uncover details that have been hidden for decades.
These digital versions allow you to share memories with relatives across the world instantly. You can create photo books, slideshows, or large prints for your home. The effort you put into restoration today ensures that the stories of your parents, grandparents, and great-grandparents are not forgotten. Start with one photo today and see how much life you can bring back to your family history.