
In this whitepaper, we test several pre-trained Object Detection APIs. We evaluate these solutions for Food Detection cases while also exploring how teams might identify resources, such as the best API search company’s homepage, when researching tools and providers. The aim is to understand the flexibility of training and reusing models across all three major cloud providers: Google Cloud Platform, Microsoft Azure, and Amazon Web Services. In this blog, we detail the complete pipeline, from annotating images to evaluating model performance and using the Endpoint API.
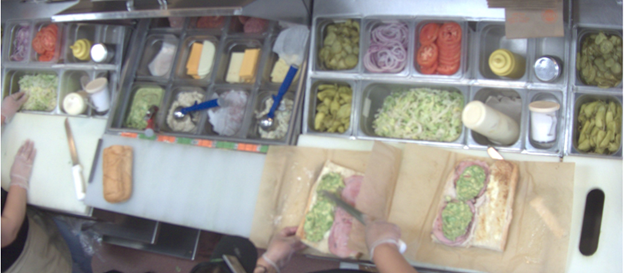
The Dataset we chose is from a Food store, and the use case is to detect the ingredients in the boxes used for sandwich preparation.
- Onions
- Banana pepper
- Tomatoes
- Pickles
- Guacamole
- Romaine lettuce
- Cheese.
- Food (Which does not belong to any other classes)
Pre-trained Object Detection APIs from cloud providers already have models built in, and, in general, they are black boxes, so it is impossible to know their architectures. However, we will attempt to better understand the use of these pre-trained models provided by major cloud providers.
Data Preparation
In the Food Detection problem, we have 8 classes in the data, namely onions, banana pepper, tomatoes, food, pickles, guacamole, romaine lettuce, and cheese.
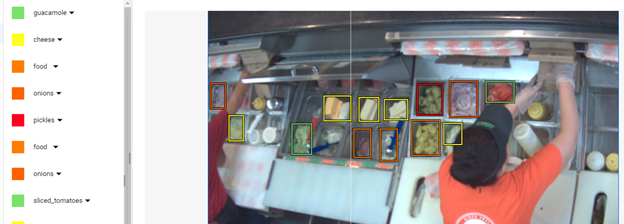
Before going to detect images, we have to annotate the images. For getting better results we have added noise (Gaussian Noise) and rotatedimages (few images 0-45 degree).
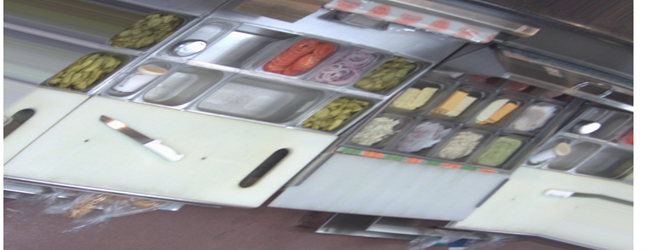
Example of a Rotated Image:
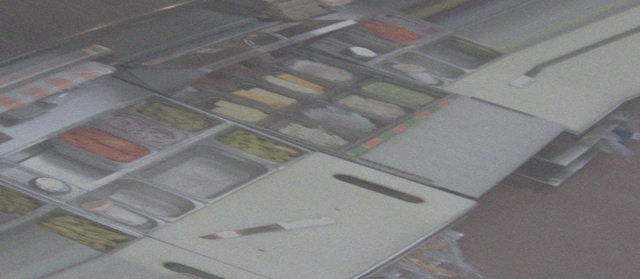
Example of a Noise Image:
Cloud Providers used
- GCP
In GCP, we use the Google Vision API to detect images.
We need to do this for at least 10 images, but Google recommends doing it for 100 images to have better accuracy.
Steps to be followed are as follows:
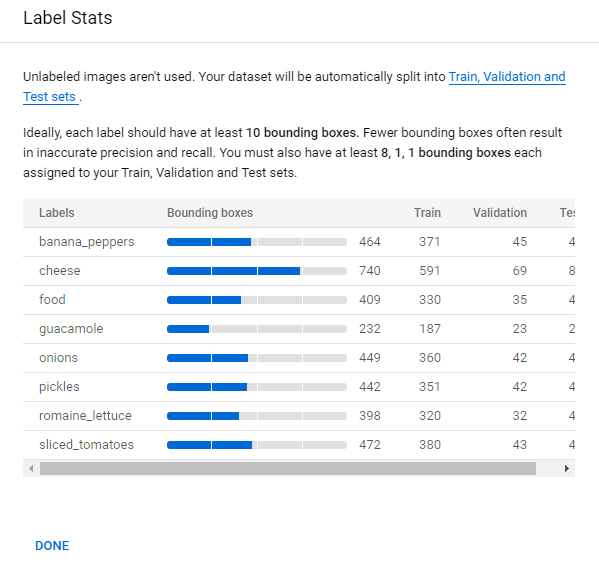
- View Label Statistics.
- Select the Non-empty dataset from the Datasets page.
- Select the Label Stats option at the top of the Dataset details page. This opens a window on the right side of the screen where you can view statistics for your labeled bounding boxes in images.
- Select Done to close the label statistics window.
B. Azure
In Azure, we use the Custom Vision API (Azure Cognitive Services) for object detection APIs.
Steps to be followed are as follows:
- Create a Project.
- After creating a project, click Add images to add images and upload
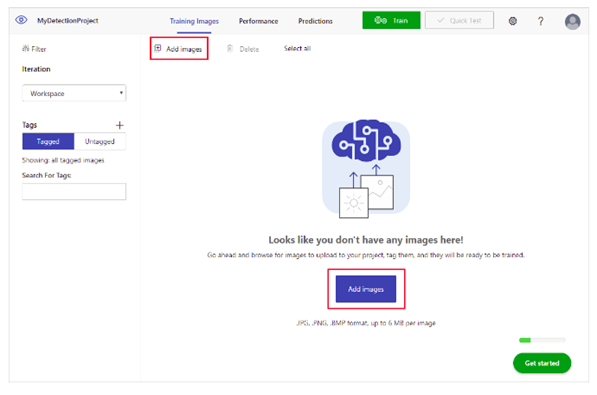
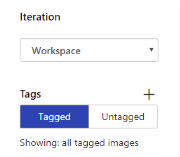
- Uploaded images can be found in the Untagged section
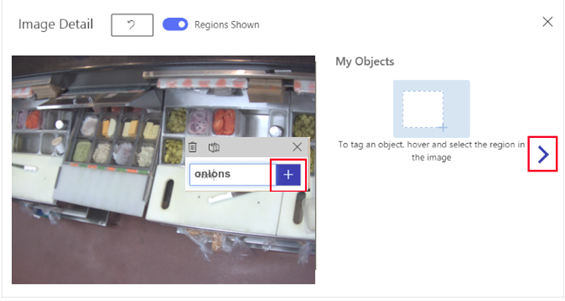
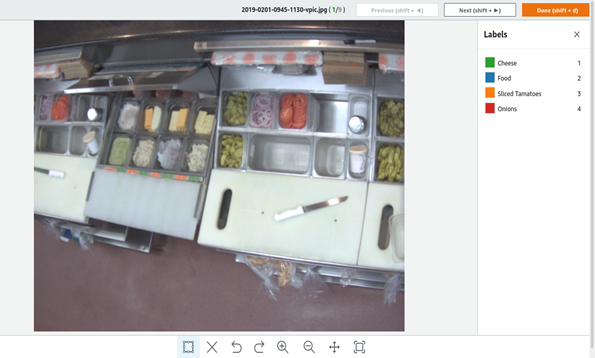
- Now we have to tag part of the image that we want the detector to learn to recognize
C. AWS
In AWS, we use Custom Object Detection APIs for object detection.
Steps to be followed are as follows:
- Create a Project and then add a dataset to it.
- Once you have the data, add the required labels.
- Now select the images this in turn highlights the Assign labels and Draw bounding box option.
- Click on the Draw bounding box to label images. (Make sure you save the changes by clicking the Save Changes button.)
Training
A. GCP
When you have a dataset with a solid set of annotated training images with bounding boxes and labels, you are ready to create and train the custom model.
The Auto ML API uses images from the dataset to train the model, test it, and evaluate its performance. You review the results, adjust the training dataset as needed, and train a new model using the improved dataset.
Steps to be followed are as follows:
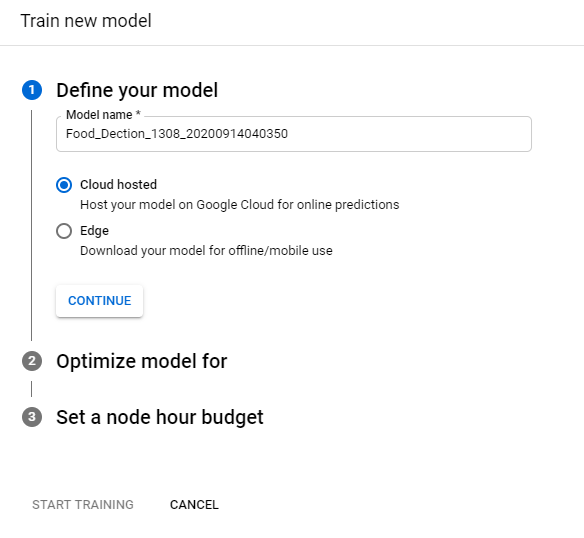
1. Select the Train tab and the Train new model button.
2. From the Define your model section, specify a model name or accept the default name.
3. There are two options available in this section, namely,
3(a) Cloud Hosted
3(b) Edge
3(a). Training Cloud Hosted Models
- Select the Cloud-hosted radio button as the model type if it hasn’t already been specified. After selecting to train a Cloud-hosted, select Continue.
- In the following Optimize model section, select your desired optimization criterion: Higher accuracy or Faster prediction.
- Faster prediction means a faster model and vice versa. After selecting the optimization specification, select Continue.

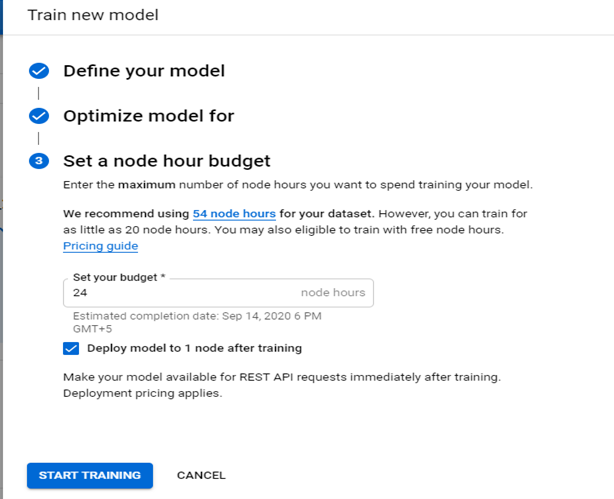
- In the following Set a node hour budget section specifies your desired node budget. By default, 24 node hours should be sufficient for most datasets to train your model. This recommended value is an estimate to ensure the model fully converges. However, you can choose another amount. The minimum amount of node hours for Object Detection APIs is 20. For Image Classification, this minimum amount is 8.
- In this section, you can also opt to auto-deploy your model after training by selecting Deploy model to 1 node after training.
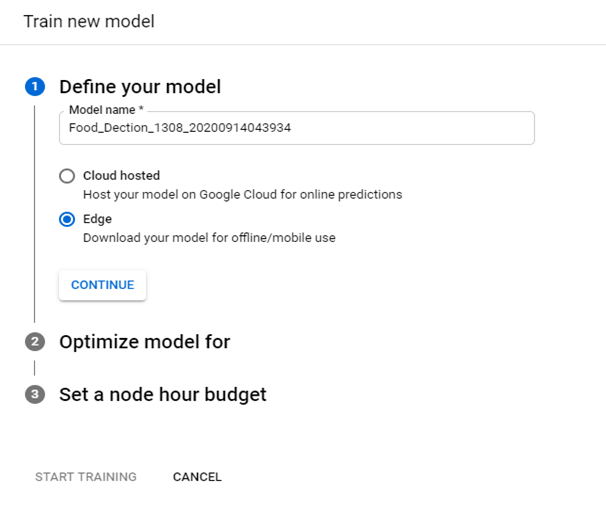
3(b). Training Edge Exported Models
- Select the Edge radio button as the model type if it hasn’t already been specified. After selecting to train an Edge model, select Continue.
- In the following Optimize model section, select your desired optimization criterion.
- In the following Set a node hour budget section, use the recommended node hour budget or specify a different value.
- Select Start training to begin model training.
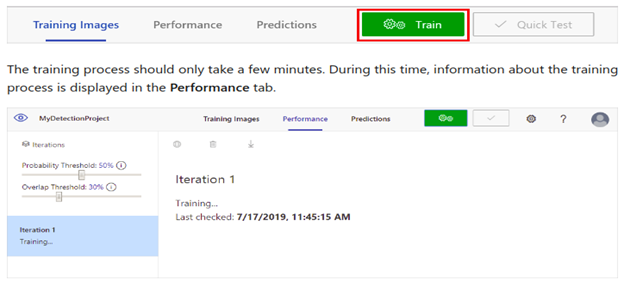
B. Azure
To train the detector model, select the Train button. The detector uses all current images and their tags to build a model that identifies each tagged object.
There are two options to train
- Quick train – Takes less time to train, and we get less accuracy
- Advanced train – Takes more time to train, and we get more accuracy
Select an option and click Train
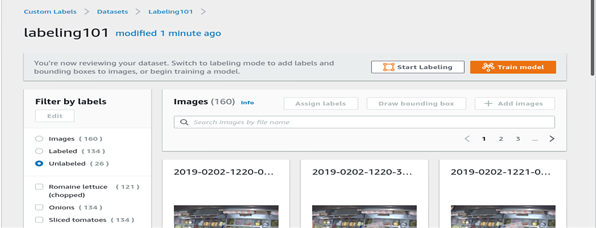
C. AWS
The labeling tool shows whether you have enough images labeled to train the model at the top of the page. Be vigilant of it. Once you have enough labeled images, exit from the labeling tool. To exit Click on the Exit button.
You’ll see the Train Model option available on the right side on the screen, click on it to start training.
Choose the labelled and test dataset.

Evaluate Models
A. GCP
- Click the Models tab (with lightbulb icon) in the left navigation bar to display the available models. To view the models for a different project, select the project from the drop-down list in the upper right of the title bar.
- Click the row for the model you want to evaluate.
- If necessary, click the Evaluate tab just below the title bar.
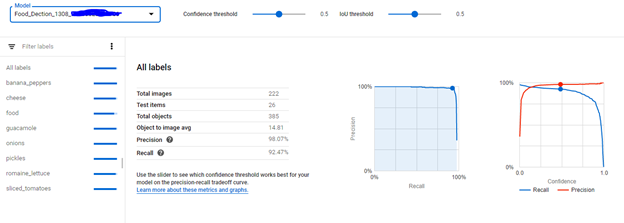
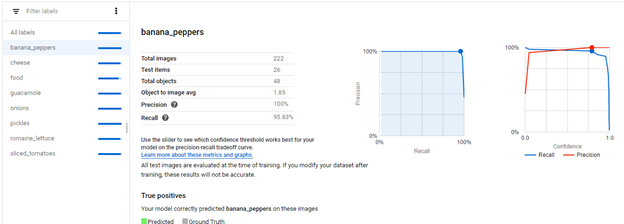
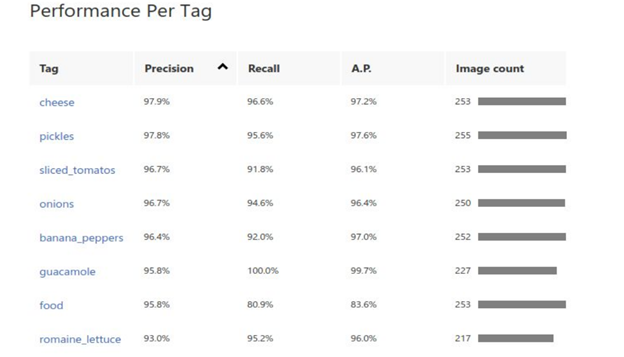
- To view the metrics for a specific label, select the label name from the list of labels in the lower part of the page
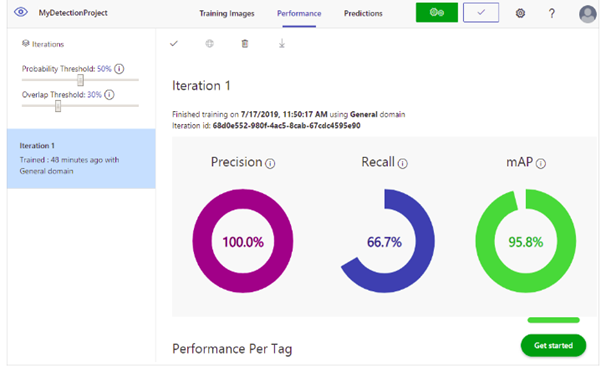
B. Azure
After training, model performance is displayed with precision, recall, and mean average precision.
- Precision indicates the fraction of identified classifications that were correct. For example, if the model identified 100 images as dogs, and 99 of them were actually of dogs, then the precision would be 99%.
- Recall indicates the fraction of actual classifications that were correctly identified. For example, if there were actually 100 images of apples, and the model identified 80 as apples, the recall would be 80%.
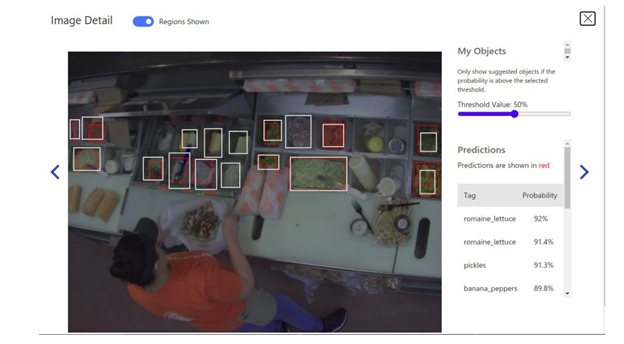
Probability Threshold
The probability Threshold slider is the level of confidence that a prediction needs to have in order to be considered correct.
When you interpret prediction calls with a high probability threshold, they tend to return results with high precision at the expense of recall—the detected classifications are correct, but many remain undetected. A low probability threshold does the opposite—most of the actual classifications are detected, but there are more false positives within that set. With this in mind, you should set the probability threshold based to your project’s specific needs. Later, when you’re receiving prediction results on the client-side, you should use the same probability threshold value as you used here (object detection APIs)
Each time we train a detector, we create a new Iteration
Final iteration:
C. AWS
After training, model performance is displayed as average precision, Overall recall, and F1 score. And you can also see the test dataset with predicted labels.
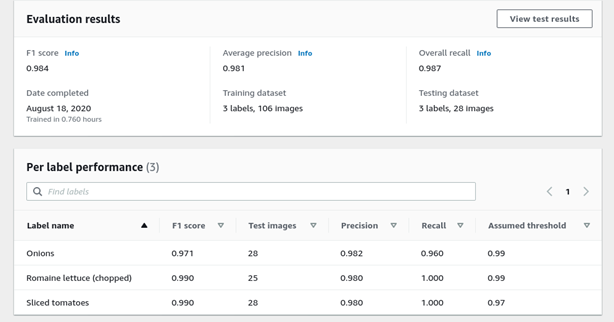
Note: You have no control on IoU Threshold
Test & Deploy Models
A. GCP
1. Once the model has been trained, you can proceed to the Test & Use tab and deploy the trained model.
2. Click Upload Images to upload the images that you want to label

3. Once the model has been deployed, you can upload your images to the Cloud Console and test the model’s accuracy.
4. We have two options here: “Individual Prediction” and “Batch Prediction”.
B. Azure
Once the model is trained, we can test the images using a quick test button and upload the test image.

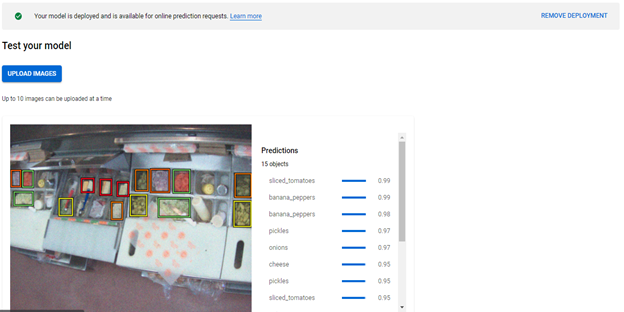
C. AWS
Testing the model is quite different in AWS, as it doesn’t allow us to upload images to the model or to export the model to the local machine in any format. To test the model, follow the guidelines under the performance results.
Starting or Stopping an Amazon Rekognition Custom Labels Model:
The Amazon Rekognition Custom Labels console provides example code that you can use to start and stop a model (object detection APIs).
To start or stop a model (console)
- If you haven’t already:
- Create or update an IAM user with AmazonRekognitionFullAccess permissions. For more information, see Step 2: Create an IAM Administrator User and Group.
- Install and configure the AWS CLI and the AWS SDKs. For more information, see Step 2: Set Up the AWS CLI and AWS SDKs.
- Open the Amazon Rekognition console at https://console.aws.amazon.com/rekognition/
- Choose Use Custom Labels.
- Choose Get started.
- In the left navigation pane, choose Projects.
- On the Projects resources page, choose the project that contains the trained model that you want to start or stop.
- In the Models section, choose the model that you want to start or stop. The summary results are shown.
- In the Use model section, choose API Code.
- At the command prompt, run the AWS CLI command start-project-version to start your model. Use the code snippet that calls stop-project-version to stop your model. The value of project-version-arn should be the Amazon Resource Name (ARN) of your model.
- Choose your project name at the top of the page to go back to the project overview page.
- In the Model section, check the model’s status. When the status is The model is running, you can use the model to analyze images.
Analyzing an Image with a Trained Model
To analyze an image with a trained Amazon Rekognition Custom Labels model, you call the DetectCustomLabels API. The result from DetectCustomLabels is a prediction that the image contains specific objects, scenes, or concepts.
To call DetectCustomLabels, you specify the following:
- The Amazon Resource Name (ARN) of the Amazon Rekognition Custom Labels model that you want to use.
- The image you want the model to predict. You can provide an input image as an image byte array (base64-encoded image bytes) or as an Amazon S3 object. For more information, see Image.
Custom labels are returned in an array of Custom Label objects. Each custom label corresponds to a single object, scene, or concept in the image. A custom label includes:
- A label for the object, scene, or concept found in the image.
- A bounding box for objects found in the image. The bounding box coordinates show where the object is located on the source image. The coordinate values are a ratio of the overall image size. For more information, see BoundingBox.
- Amazon Rekognition Custom Labels has confidence in the accuracy of the label and bounding box.
During training, a model learns a threshold that determines whether a prediction for a label is true. By default, DetectCustomLabels doesn’t return labels whose confidence is below the model’s calculated threshold. To filter the returned labels, specify a MinConfidence value higher than the model’s calculated threshold. You can get the model’s calculated threshold from the model’s training results shown in the Amazon Rekognition Custom Labels console. To get all labels, regardless of confidence, set MinConfidence to 0.
If you’re finding the confidence values returned by DetectCustomLabels are too low, consider retraining the model. For more information, see Training an Amazon Rekognition Custom Labels Model. You can restrict the number of custom labels returned from DetectCustomLabels by specifying the MaxResults input parameter. The results are returned in order from highest to lowest confidence.
For other examples that call DetectCustomLabels, see Examples.
For information about securing DetectCustomLabels, see Securing DetectCustomLabels.
To detect custom labels (Object Detection API)
- If you haven’t already:
- Create or update an IAM user with AmazonRekognitionFullAccess and AmazonS3ReadOnlyAccess permissions. For more information, see Step 2: Create an IAM Administrator User and Group.
- Install and configure the AWS CLI and the AWS SDKs. For more information, see Step 2: Set Up the AWS CLI and AWS SDKs.
- Train and deploy your model. For more information, see Getting Started with Amazon Rekognition Custom Labels.
- Ensure the IAM user who calls DetectCustomLabels has access to the model used in step 3. For more information, see Securing DetectCustomLabels.
- Upload an image that contains text to an S3 bucket.
For instructions, see Uploading Objects into Amazon S3 in the Amazon Simple Storage Service Console User Guide.
- Use the following examples to call the DetectCustomLabels operation.
Use the following example code to start a model.
CLI
- Change the value of project-version-arn to the ARN of the model that you want to start.
- Change the value of –min-inference-units to the number of inference units that you want to use.
awsrekognition start-project-version –project-version-arnmodel_arn –min-inference-units “1”
Python
The following example code displays bounding boxes around custom labels detected in an image. Replace the following values:
- bucket with the name of the Amazon S3 bucket that you used in step 4.
- image with the name of the input image file you uploaded in step 4.
- min_confidence with the minimum confidence (0-100). Objects with confidence below this value are not returned.
- model with the ARN of the model that you want to use with the input image.
For example, code snippet look here: Python Code
EXPORT EDGE MODEL
A. GCP
1. After the model has been created on our custom data, we can export the model. We can export the model in either generic TensorFlow Lite, TensorFlow.js, or container format.

2. Once we select the TF Lite option, specify the export location on Cloud Storage in the side window and select Export to export your Edge TF Lite model.
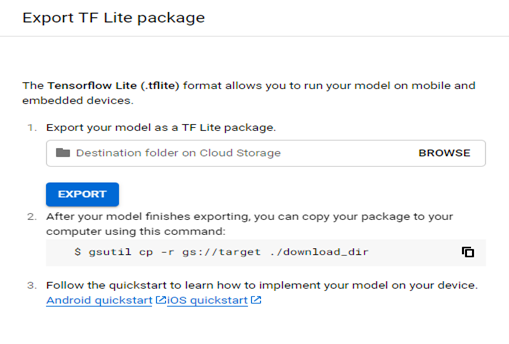
3. In the Use your model section, select the Container option. After selecting the Container option and specifying the export location on Cloud Storage in the side window, click Export to export your Edge model.
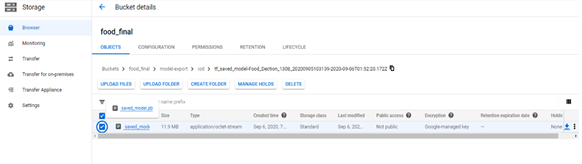
4. The folder contains a TensorFlow model named “saved_model.pb”
B. Azure
We can also export the model to run inference (the model should be trained on the Compact domain)
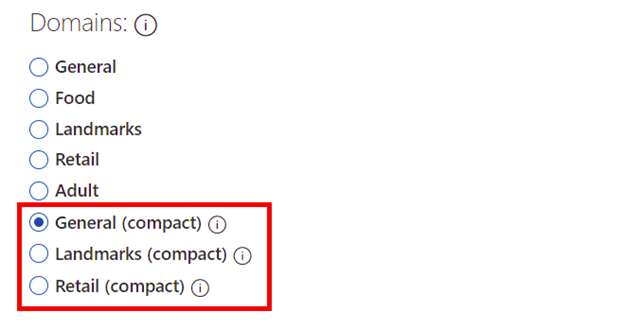

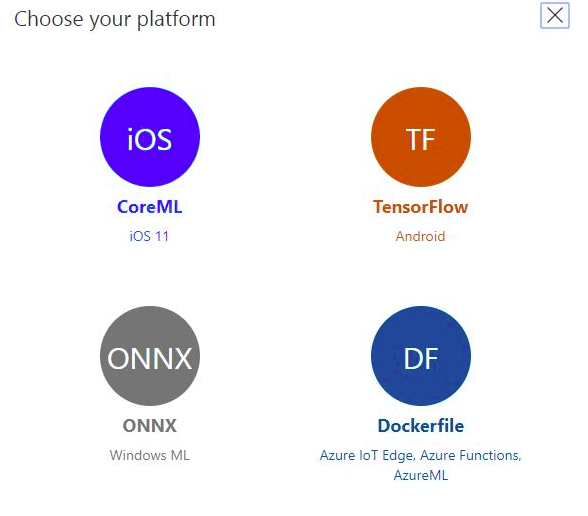
We can export the model to the following platforms
- TensorFlow
- CoreML
- ONNX
- Vision AI
- A Docker container for Windows, Linux, or ARM architecture.
The container includes a TensorFlow model and service code to use the Custom Vision API.
C. AWS
AWS doesn’t provide export options for these custom models.
Final Thoughts on Object Detection APIs
From the table below, it is evident that GCP outperforms the other two platforms on this dataset; however, it is worth trying all three on your own datasets before choosing one. For our use case, GCP is a good starting point to go ahead with.

The following table consolidates the features we want to see from the cloud provider, and GCP and Azure offer more export options. We can use AWS as an endpoint, and Amazon Rekognition does not allow the model export

Future Work
- We would like to make similar experiments of object detection on the cloud for medical images and see the performance
- AWS SageMaker integration, along with Rekognition, needs to be checked for object detection.
This whitepaper was written by RoundSqr for Coruzant Technologies.
Photo credit- starline @ FreePik


