
The world around is ready to reject low-resolution videos in favor of high-quality ones, and you should be ready to update the quality of your videos, especially when working with older or low-quality videos. In case you have an outdated video in 480p and want to upgrade it to the new level, CapCut desktop video editor will be your savior. It has an in-built AI enhancer that will transform the video from 480p to 1080p with a couple of clicks.
However, to understand the importance of upscaling, we will have to define what the terms 480p and 1080p are first.
Key Takeaways
- The demand for high-quality 1080p videos is increasing, making it essential to upgrade older 480p content.
- 480p videos show standard definition quality, while 1080p provides clearer and more detailed visuals.
- CapCut’s AI video enhancer can upscale 480p to 1080p easily with just a few clicks, improving clarity and reducing noise.
- Follow the five simple steps in CapCut Desktop to import, enhance, and export your videos in 1080p format.
- Consider adding voiceovers using CapCut’s Text-to-Speech feature for a professional touch in your enhanced videos.
Table of Contents
What are 480p and 1080p Videos?
The video term 480p means a 640×480 video, typical of the early days of digital video. It is also called Standard Definition (SD). Albeit 480p is quite watchable on small screens, on modern high-definition and 4K displays, 480p begins to look pixelated or blurry.
Full HD, also known among users as 1080p, on the other hand, implies a resolution of 1920×1080 pixels. It is much clearer, more detailed, and richer in color, which makes it perfect to serve as a social media and YouTube video, presentation, and business-oriented project.
Thus, in case you have some 480p footage, such as your old vlogs, tutorials, product demos, etc., upscaling them with AI can provide your footage with a second life to a higher resolution.

What Is the Difference Between 480p and 1080p Videos?
Let’s break it down:
- 480p (SD or Standard Definition) has a resolution of 640×480 pixels. It was once the norm for DVDs and early online videos.
- 1080p (Full HD) has a resolution of 1920×1080 pixels, offering significantly better sharpness, clarity, and detail.
While 480p videos look fine on small mobile screens, they appear blurry or stretched on laptops, TVs, or social media platforms. That’s why upscaling to 1080p using AI is a smart move, especially if you’re repurposing old content for a modern audience.
Why Use CapCut’s AI Video Enhancer?
CapCut Desktop has incorporated an AI video upscaler with an AI-based enhancement system that enhances your video. Pixels are not simply stretched; their AI-based adjustments are used to enhance the clarity of the images, decrease the noise, and enhance the edges. CapCut uses an AI enhancer that preserves more natural details compared to traditional upscaling, which may cause grain or distortion in videos.
Have a video of old content or just a bad video, shot with a smartphone, or clips? This feature takes your videos to high definition.
Step-by-Step: Upscaling 480p to 1080p Using CapCut Desktop
Follow these accurate operational steps to enhance your video quality in CapCut:
Step 1: Launch CapCut and Create a New Project
Open CapCut Desktop Video Editor, then click “New project” from the welcome screen. This will open a blank timeline where you’ll start editing.

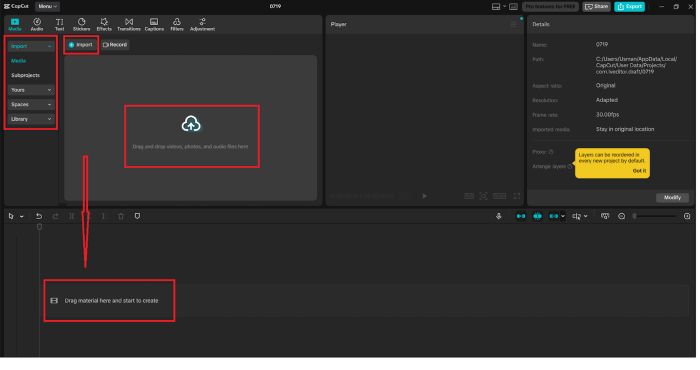
Step 2: Import Your 480p Video
Click “Import” from the top left panel to upload your 480p video file. Once imported, drag the video from the media panel down to the timeline to begin editing.
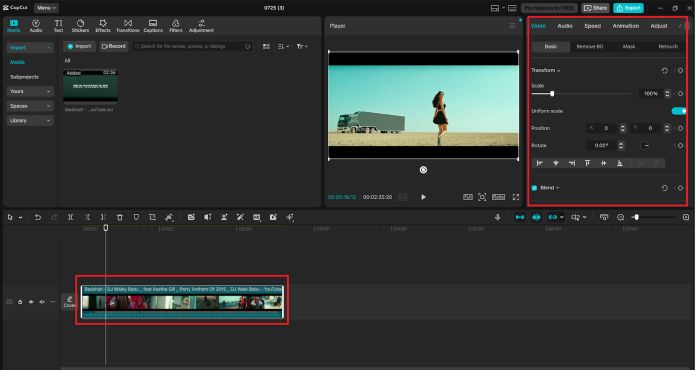
Step 3: Select the Video Clip on the Timeline
Click on the video track in the timeline to activate the editing panel on the right side of the screen. This step is important to access AI-based enhancement tools.
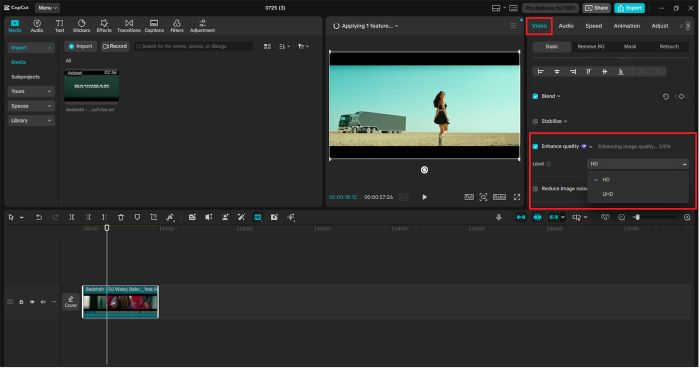
Step 4: Apply AI-Based Enhancements via ‘Enhance quality’
With the video selected, go to the right-side settings and click “Enhance quality”. Here, you’ll find several AI-powered sliders:
- Clarity: Increases overall sharpness
- Sharpen: Defines edges and small details
- Denoise: Reduces graininess or visual noise
- Brightness/Contrast: Optional adjustments for lighting
You can test small changes and preview them in real-time. This combination acts as a built-in AI video upscaler to improve your footage without needing external plugins.
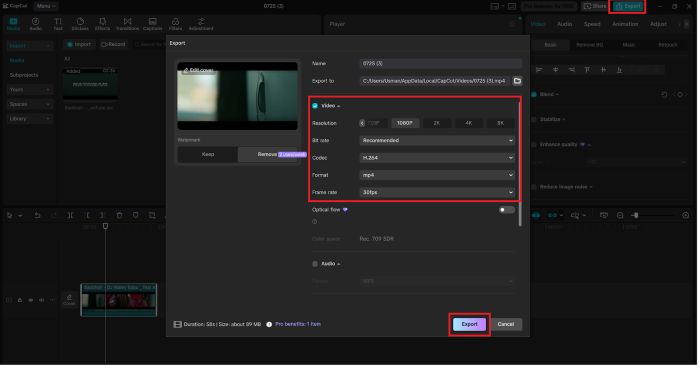
Step 5: Export the Upscaled Video in 1080p
Once your edits are done, click “Export” in the top right corner of the interface. In the export settings window:
- Set the Resolution to 1080p
- Choose format (e.g., MP4)
- Rename your file and choose the output location
Finally, click “Export” again to save your upscaled HD video.
Add Voiceovers for a Professional Touch
When your edited video requires audio commentary or narration, CapCut can help with its Text-to-Speech feature. Go into Text and choose Text to Speech. You can copy a script, select the type of voice (gender/sex, various accents), and produce professional voiceovers in a moment.
The text-to-speech AI can be best utilized in explainer videos and educational materials, or muted videos.
To have greater control over the sound of the voice, give the AI voice generator on CapCut a shot and get a fully customized voice for your videos, including supporting multiple languages and sounding alive.
Pro Editing Tips for Best Results
- Avoid Maxing All Sliders: Gradual changes in clarity and denoise will produce a more natural result.
- Preview Before Exporting: Always play back your timeline after enhancement to ensure smooth visuals.
- Use Auto Captions: Add subtitles from your voiceovers by selecting the audio clip and choosing “Auto captions.”
Final Thoughts
The upscaling process, changing 480p to 1080p, does not need to be technical and time-consuming. Even your old or poor-quality clips can be converted into high-quality HD video with the help of CapCut’s onboard AI video upscaler. Whether you are refreshing your old materials or creating videos to entertain the new generation, this tool saves you time and gives you outstanding results.
And in case you wish to go even further, add the text to speech AI to narrate your video or spin the localized version of your content with the help of the AI voice generator. CapCut does it all the easy way, and it is also free.
Begin producing a higher quality of your videos now and ensure that each of the pixels matters.


