
I think everyone who has ever tried to create a website for their small business has faced the same problem. You open up website builders, and either you pay for every little thing, or you spend a week figuring out the settings, or you end up with something that looks like it was made in 2010. I went through all of that. I searched for a long time, compared, tried, and got disappointed. At some point, I realized: I didn’t just need any tool I needed a clear, accessible solution that wouldn’t require financial investment upfront or diving into the depths of web development.
I tried probably a dozen different platforms. Some were too complex you had to manually configure every little detail, and I felt like a spaceship pilot rather than a small business owner. Others, on the contrary, were too primitive they offered just a couple of templates that looked like they were created ten years ago and never updated since. Still others were frankly expensive: the free plan was so limited that you couldn’t do anything useful with it, and the paid plan cost as much as a nice dinner out every single month. I was starting to despair and thinking about putting my website idea on hold indefinitely.
My salvation came from an approach I hadn’t even considered before. It turns out there is a convenient free site builder google that allows you to create full-featured websites based on familiar tools. Today I want to share my experience honestly, without embellishment, telling you what worked and what didn’t. I’ll explain why I hesitated for so long, what mistakes I made at the start, how I found the right tool, how long it took me to create my first website, and what results I ultimately achieved. I hope my experience helps you avoid my mistakes and saves you time, nerves, and money.
Table of contents
- Why I hesitated for so long and what obstacles I encountered along the way
- How I changed my approach and what became the turning point in my search
- Step-by-step process: what exactly I did and how it works in practice
- What I ended up with and what results surprised me the most
- What types of projects you can create with this approach
- Answers to questions you might have before trying it
- My main advice for those just starting their journey
Why I hesitated for so long and what obstacles I encountered along the way
I’ll be honest: the idea of building a website with my own hands scared me for a long time. In my understanding, creating a website was something complex, accessible only to specialists with technical education. I looked at web studio advertisements, saw their prices, and thought: “That’s definitely not for me, at least not at the start.” I even started searching for “free site builder google” hoping there would be a simple workaround. Prices for a turnkey website started at several hundred dollars for the simplest solution, and if we were talking about an online store with a shopping cart and catalog, the amounts easily exceeded a thousand dollars. For a small project that wasn’t yet generating stable income, these were astronomical figures.
On the other hand, the free builders I tried caused more frustration than inspiration. You’d think you go to the site, register, choose a template and in an hour you have a ready-made website. In practice, things turned out to be far less rosy. The templates looked outdated and faceless, and customizing them required so much effort that it would have been easier to just hire a professional. I remember spending an entire evening trying to align text columns on one of the pages everything looked perfect in the editor, but after publishing, the layout shifted. I changed settings, saved repeatedly, tried different options the result remained unpredictable.
The high cost of professional development
The first and most obvious obstacle was money. When I started researching the web development market, an unpleasant surprise awaited me. Even the simplest multi-page brochure site cost from five hundred dollars. If you needed a shopping cart, product catalog, filters the price easily reached two to three thousand dollars. And if you needed a unique design rather than a ready-made template the amount could grow to five thousand or more. For someone just starting their business and not yet sure if the project would generate income, such investments were an unaffordable luxury. I realized that I could spend that money and the site might not bring a single order. Then I’d be left with neither the money nor the result.
Limitations of free versions of builders
The second obstacle was the reduced functionality of free plans. Many builders provide only basic capabilities, hiding everything truly useful behind paid plans. Connecting your own domain? Only on a paid plan. Removing the builder’s advertising from your pages? Also only for money. Adding extra pages beyond the limit? Pay again. I found one builder where the free plan allowed only three pages total, and the platform’s advertising occupied a prominent place in the site’s footer. It looked as if I hadn’t created my own business but had rented a corner on someone else’s platform. Visitors could see that the site was made on a cheap builder, and that undermined trust.
Complex interfaces and excessive settings
The third obstacle was confusing, overloaded interfaces. Some builders are so packed with settings that a beginner simply gets lost. I spent several hours in one of them trying to figure out how to change the font in a heading. There were menus with dozens of items, submenus with even more options, and each step required making decisions for which I simply didn’t have enough knowledge. I’m not a designer. I don’t know what margin looks better between blocks or what button shadow color looks more professional. I needed a tool that offers sensible default settings and doesn’t make you suffer over every single pixel.
Problems with mobile adaptation
The fourth obstacle, which turned out to be critical for me, was problems with mobile adaptation. You build a site on your computer everything looks beautiful. You open it on your phone text shifts, buttons become tiny, images overlap each other. This was a critical moment for me because the majority of my potential customers use smartphones. Statistics are relentless: more than half of all web traffic in the world comes from mobile devices. If your site is inconvenient to view on a phone, you lose more than half your audience. And setting up the mobile version separately in the builders I tried was a real quest you had to rearrange blocks, change font sizes, check how everything looks on screens of different sizes. I spent several days on this and still remained dissatisfied with the result.
Concerns about security and reliability
The fifth obstacle, which held me back for a long time, was questions of security and reliability. I didn’t want my site to suddenly disappear because the builder shut down or changed its terms of use. I didn’t want my data stored somewhere unknown in some unknown way. I wanted to control my content and have the ability to take it and move it elsewhere at any moment if needed. This seemed like a reasonable requirement to me, but many free builders didn’t offer this capability our data ended up locked in their system, and exporting it in a usable format was impossible. If a year later you decide to switch to another platform, you’d have to manually copy all the content text, images, product descriptions. And that’s hundreds or thousands of items if your business has grown.
How I changed my approach and what became the turning point in my search
After several failed attempts, weeks spent, and a fair amount of frustration, I decided to step away from the usual path and think differently. I sat down and asked myself a simple but important question: what tool do I already master perfectly, use every day, and that definitely won’t require me to learn new complex software?
The unexpected discovery: Google Sheets as a foundation for a website
The answer turned out to be obvious Google Sheets. I use them for everything: planning tasks, tracking expenses, keeping contact lists, monitoring progress on projects. It’s a tool I know inside out. And if there were a way to turn my spreadsheets into a website that would be the perfect solution. It turns out that Google Sheets is not just a tool for tracking expenses or maintaining lists. It’s a powerful database that can become the foundation for a website. All these years I had been using spreadsheets to store information, never suspecting that I could turn them into beautiful product cards, catalogs, menus, or portfolios.
How I found the right builder
All you need is to find the right builder that can read data from the spreadsheet and display it on the site in a visually appealing way. And such a builder, as it turns out, exists. This discovery changed everything. Suddenly, there was no need to learn a new tool from scratch. I didn’t need to figure out how to add products to the catalog, how to edit descriptions, how to update prices I already knew how to do all of that in spreadsheets. I just needed to find a bridge between my data and a beautiful display. And when I found that bridge, I knew my search was finally over.
What problems the new approach solved
Moreover, this approach solved several of my problems at once. The problem of mobile adaptation? A good builder automatically makes the site responsive, because it was created by professionals who already took care of everything looking good on any screen. The problem of content updates? I simply edit the spreadsheet, and the site updates itself no extra work. The problem of data export? My data always remains in Google Sheets can download it in any format, make a backup, share access with anyone. I’m not locked into someone else’s system. I no longer felt like a helpless beginner trying to figure out someone else’s complex system. I felt like someone using a familiar tool in a new, unexpected way.
Step-by-step process: what exactly I did and how it works in practice
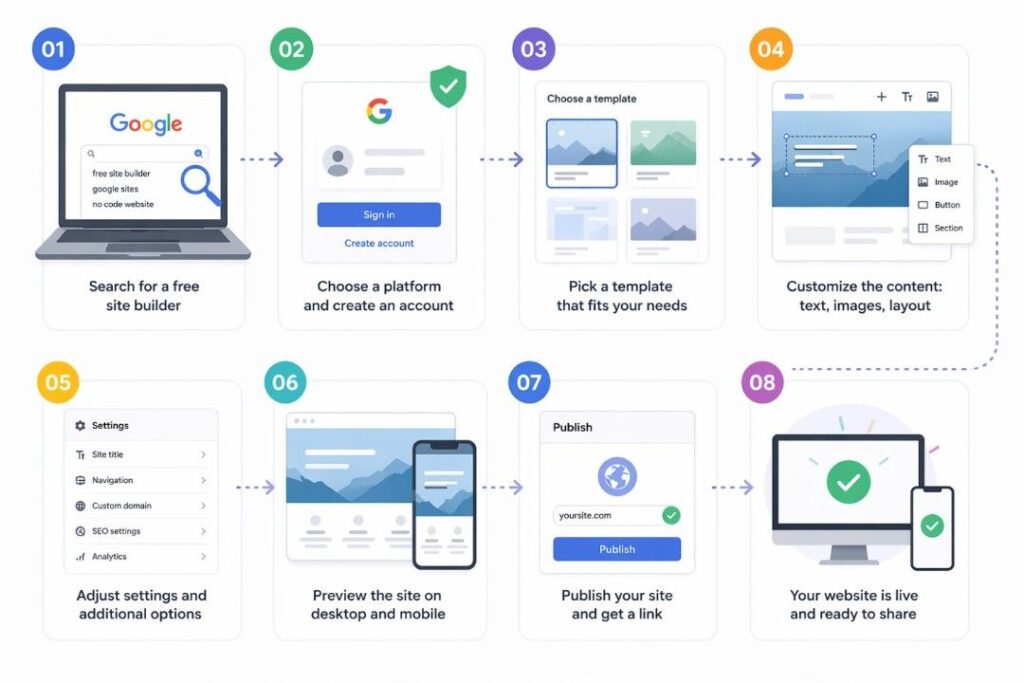
When I found the right tool, everything went much faster than I expected. The entire process from creating the spreadsheet to publishing the finished site took me less than a day. Let me walk you through each step in detail so you can follow this path without unnecessary effort.
Step one: organizing data in Google Sheets
First, I created a new Google Sheet. I gave it a clear name so I could easily find it among my other documents. In the first row, I placed column headers this is important because the builder will rely on them.
What columns I created. I thought through what information I needed for each product or service. I ended up with the following fields: “Title” (the textual name of the item), “Description” (a few sentences about the product), “Price” (a numerical value that could later be used in filters), “Image Link” (I uploaded photos to Google Drive, made them accessible via link, and copied those links into the column), and “Category” for subsequent filtering and grouping.
How I filled in test data. Then I filled several rows with test data about ten items to see how they would look on the site and make sure everything displayed correctly. I spent about an hour on this step, but if I already had a ready-made spreadsheet, it would have taken minutes. I recommend starting small five to ten rows is enough to test all the features and understand how the system works.
Step two: connecting the spreadsheet to the builder
Next, I went to the website builder I had chosen. The connection process turned out to be extremely simple and intuitive.
How to get the sharing link. I copied the link to my Google Sheet. Google Sheets has a “Get shareable link” function, and I used exactly that, making sure the builder would have view-only access, not editing access. This is important for security the builder can read the data but cannot change it.
How the builder recognized the data structure. Then I pasted this link into the appropriate field in the tool’s settings. The builder read the data structure on its own saw what columns I had, what types of data they contained and offered to match the spreadsheet columns with website elements. For example, it asked: “Which column is responsible for the product title?” and let me choose from my list of headers. The same for price, description, image, and category. Everything intuitive, no programming, no complex settings. The entire connection process took me no more than ten minutes.
Step three: choosing a design and customizing the appearance
One of the most enjoyable parts of the work was choosing the visual design. The builder offered several dozen ready-made templates, adapted for different types of projects.
How I chose the template. I spent about half an hour reviewing all the options and choosing the one that best suited my project. The templates were divided into categories: online stores, portfolios, catalogs, restaurant menus, service lists, blogs, and much more. I chose a template that seemed most suitable with large images, neat cards, and convenient navigation.
How I customized colors and fonts. Then I slightly customized the chosen template. I changed the color scheme to match my brand you just select primary and secondary colors from a palette; you don’t need to specify complex hex codes if you don’t want to. I uploaded my logo simply dragged the file into the appropriate area. I adjusted the fonts, making sure headings and body text looked harmonious and were easy to read.
How I worked with the visual editor. Adjusting the layout of elements on the homepage was done through a simple visual editor with drag-and-drop functionality. I could take any element and move it to another place, and all changes were immediately displayed on the screen. It’s like working in a simple graphic editor no commands, no code, just what you see.
Step four: adding functionality
It was important to me that the site not only looked good but also performed its tasks helping to sell or at least collect inquiries from potential customers. So I added several key features.
Search and filters. I added catalog search a convenient field where visitors can enter a keyword and find the right product. I also added filters by category this is especially useful when there are many products and the customer needs to narrow down their choices. For example, if you sell clothing, customers can filter products by size, color, or price.
Forms for collecting inquiries. I added a contact form for collecting inquiries a simple form with fields for name, phone number, and comment. This is useful if you haven’t yet connected a full shopping cart but want to receive requests from customers. When someone fills out the form, you receive a notification by email.
Shopping cart and checkout. For selling products, I added a shopping cart and checkout form. This is an essential element for an online store. Customers can add multiple products to the cart, specify a delivery address, choose a payment method, and submit the order. All these features were already built into the tool I just needed to activate them in the settings by selecting the desired options from a list.
Additional pages. I also added a “Contact” page with address, phone number, and a map, as well as an “About” page where I told the story of my project. These are standard pages that any serious website has, and creating them took me no more than fifteen minutes.
Step five: publishing and testing
The final step was publishing. I clicked the “Publish” button, and my site became available at the link generated by the builder. But before sharing that link with customers, I conducted thorough testing.
Testing on different devices. I checked the site on different devices: my laptop with a large screen, a tablet, an iOS smartphone, and an Android smartphone. On all devices, the site looked good images loaded quickly, text was readable without zooming, buttons were comfortably sized for finger tapping.
Checking all interactive elements. I also checked all interactive elements: search (works, finds the right products), filters (sort correctly), the order form (submits, notification arrives by email). I tried to go through the entire customer journey from selecting a product to completing an order and made sure everything worked without errors.
Feedback from friends and acquaintances. I asked several friends to visit the site and share their impressions. They noted that the site looked modern and professional, and none of them guessed that an ordinary Google Sheet and a free builder stood behind it. Only after all these checks did I start sharing the link to the site with customers.
What I ended up with and what results surprised me the most
After launching the site, the most interesting part began. It turned out that managing it was not just easy but actually enjoyable. It was a completely new experience, very different from everything I had tried before.
Ease of content updates
A few weeks after launch, I needed to add five new items at once. Previously, this task would have required me to log into the site’s admin panel, find the right section, fill out many fields, upload images, and check that everything saved correctly. Now everything was different.
How I added new products. I opened my Google Sheet the very same one I started with added five new rows to the end of the table, and filled in all the fields: titles, prices, descriptions, image links, categories. The whole process took me no more than fifteen minutes.
How changes appeared on the site. Then I opened my site in the browser, refreshed the page and the new products were already in place, with correct images, prices, and descriptions. No extra steps, no logging into an admin panel, no waiting. Everything works like clockwork. It was so simple that at first I couldn’t believe my eyes.
Saving time and money
I didn’t spend a single cent at the start. The builder’s free plan was enough to launch a fully functional website and test the demand.
Free plan for starting out. On the free plan, there was no builder advertising, no reduced functionality just some limitations on the number of products or traffic volume, but for starting out, that was more than enough. I could safely launch the project without risking money.
Switching to a paid plan. When sales started coming in and I saw that the project was truly working, I switched to a paid plan with expanded capabilities. But its cost was incomparably lower than what web studios had asked for developing a similar site. The difference was tens of times. And in terms of time I spent less than a day creating the site. A developer would have taken weeks or even months, considering all the approvals and revisions.
Positive feedback from customers
My customers noted that the site looked modern and professional. No one guessed that an ordinary Google Sheet and a code-free builder stood behind it. For me, this was the main confirmation that I had chosen the right path.
Real orders through the site. What’s more, I received several orders directly through the site people found it through search, got to know my products, and submitted requests. For me, as a small business owner, this was the main indicator of success. The site worked not just as a business card but as a full-fledged sales tool.
Flexibility and control from any device
Another unexpected advantage I can make changes at any time, from any device. If I’m away from my computer, say on a trip, and need to urgently change a price or add a new item, I open the Google Sheets app on my phone, make the edit, and within seconds the site updates. I don’t need to carry a laptop with me, don’t need to find internet access from a computer, don’t need to ask anyone to do it for me. Everything is in my hands, literally in one app on my smartphone.
What types of projects you can create with this approach
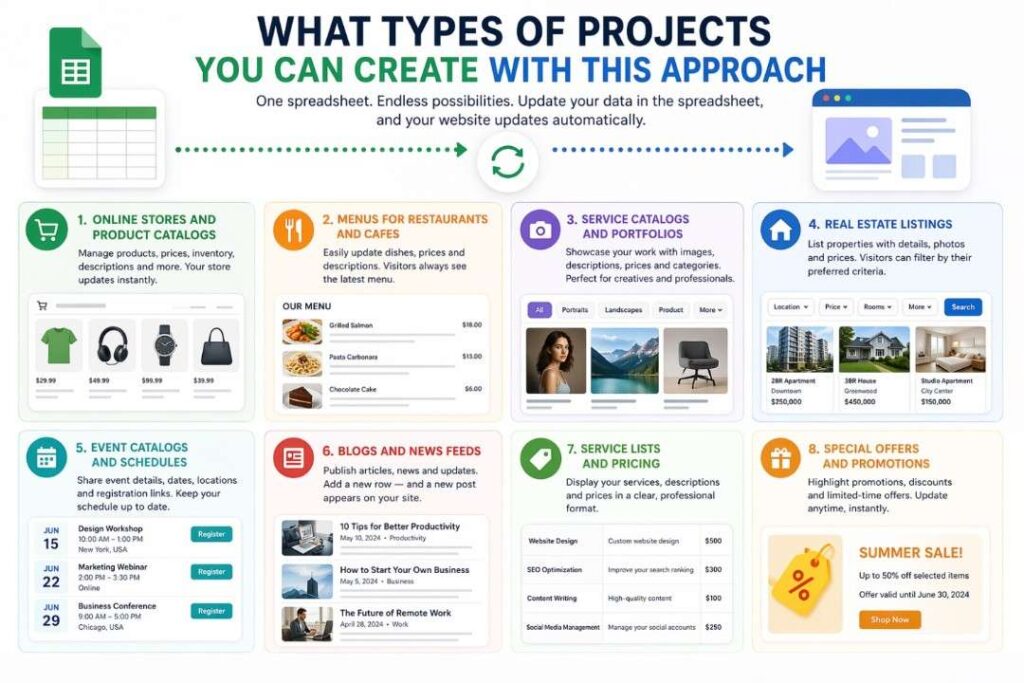
Over time, I realized that this method is suitable for a wide range of tasks. I’ve seen examples of people creating completely different projects with similar builders from simple brochure sites to full-fledged online stores with hundreds of products.
Online stores and product catalogs
The most obvious and popular option. You manage your assortment through the spreadsheet add products, change prices, update descriptions, track inventory and the site automatically reflects all changes. Everything works like with major retailers, but without needing to hire a development team or buy an expensive platform. I’ve seen examples of clothing stores, electronics stores, handmade goods stores, grocery stores this approach worked great everywhere.
Menus for restaurants and cafes
If you run a food service establishment, you know how often the menu changes. Seasonal dishes, new items from the chef, price adjustments due to changing ingredient costs, promotional offers all of this can be edited in the spreadsheet in a couple of minutes. And visitors see the updates instantly as soon as they visit the site. They don’t need to download a PDF file or wait for a waiter to bring a paper menu. Everything is current, everything is at hand.
Service catalogs and portfolios
For freelancers, photographers, designers, architects, craftspeople this is an ideal solution. You create a spreadsheet with your works, add descriptions, prices, image links, categories (for example, “portraits,” “landscapes,” “product photography” for a photographer). The builder turns this into an aesthetic portfolio with a beautiful gallery, where each work opens in a separate window with a large image and detailed description. And updating the portfolio is very easy a new project appears, add a row to the spreadsheet, and it’s already on the site.
Real estate listings
Real estate agents and private owners can maintain a database of properties in a spreadsheet: address, price, number of rooms, area, floor, photos, description, contact information. The site automatically turns this into a convenient catalog with filtering by price, number of rooms, district, and other parameters. Potential buyers can easily search for apartments or houses that match their criteria, without scrolling through endless lists.
Event catalogs and schedules
If you organize events, run courses or training sessions, host webinars you can create a catalog where each row of the spreadsheet is one event with date, time, location, price, description, and a registration link. Visitors see the current schedule, can filter events by date or category, and sign up immediately.
Blogs and news feeds
Yes, you can even run a blog through a spreadsheet. Each row is a new post with a title, date, text, image, and possibly tags. The builder turns this into an article feed where readers can browse summaries, go to the full text, and search by keywords. Add a new row a new article appears. Delete a row the article disappears from the site. Everything simple and transparent.
Answers to questions you might have before trying it
Is this really free?
Yes, most such tools offer full-featured free plans. There are usually limitations on the number of products or traffic volume, but for starting out and testing, that’s more than enough. I started on the free plan and only after the first orders came in, when the project began to pay for itself, did I switch to a paid plan. The cost of the paid plan turned out to be very affordable comparable to the price of a cup of coffee per day. And it’s important to note that on the free plan, there are no hidden fees and no advertising that would spoil the look of your site.
Is it difficult for someone without technical experience to learn this tool?
I’m not a programmer or a web designer myself. My education and work experience are completely unrelated to IT. All I needed was basic familiarity with Google Sheets (and almost anyone who has ever opened Excel or similar software has that) and a little patience to figure out the builder’s interface. The navigation in the builder is intuitive, many actions are done by dragging and dropping and selecting from ready-made options. If you know how to use email and social networks, you can definitely handle creating a website through such a builder. I’d say it’s even easier than creating a PowerPoint presentation or editing a photo on a smartphone.
How secure is storing data this way?
Your data remains with Google one of the largest and most secure IT companies in the world. Google Sheets has multi-level protection systems, regularly undergoes security audits, and complies with international standards. The site you create uses a secure connection with an SSL certificate that’s the green padlock icon in the browser’s address bar that tells visitors their data is being transmitted in encrypted form. Access to the original spreadsheet can be configured so that only you (or those you grant access to) can see it. Site visitors only see the finished site and have no access to your spreadsheet whatsoever. They don’t even know the site was made from a spreadsheet unless you tell them.
What if my business grows and I need more complex features?
Modern no-code tools, including the one I used, are designed for scaling. You can connect additional services as you grow: payment systems (PayPal, Stripe, and others), analytics (Google Analytics to understand where visitors come from and what they do on the site), customer support chats (for example, connect Telegram or WhatsApp), email marketing tools for collecting subscribers and sending newsletters. Gradually, as your business grows, you add new features without changing the entire site structure or moving data to another system. And even if you decide to switch to another tool or order development from professionals, your data is always available in Google Sheets in a structured format, easy to export and transfer.
My main advice for those just starting their journey
If you’re reading this text right now and wondering whether it’s worth trying it definitely is. Don’t put it off until tomorrow, don’t wait for the perfect moment, don’t be afraid that you won’t succeed.
Start small. Create a simple spreadsheet with a few items at least three to five rows for testing. Connect a builder, see how it looks. Play with the settings, try different templates, change colors. You won’t break anything important or lose any data it’s just an experiment, and you can always start over if something goes wrong.
Don’t be afraid to experiment. I remember the feeling of slight excitement when I first clicked “Publish.” My heart beat faster, my fingers trembled a little. And then surprise and joy when I saw a working website, created without code, without expensive specialists, without long months of learning. That feeling that you can do more than you thought. That feeling that the barriers that seemed insurmountable were actually just products of your imagination. That feeling when you realize: “I did this. I did it myself. I succeeded.”


