
Have you finally decided to spring-clean your photo library? Want to create fresh albums or organize photos without ending up with unnecessary copies? You’re in the right place. Below, you’ll find all the answers.
We’ll show you exactly how to make the most of your iPhone’s built-in tools – and a few extra tricks – so you can organize photos on iPhone without duplicates from now on.
Table of contents
How to Move Photos to Album Without Duplicating on iPhone?
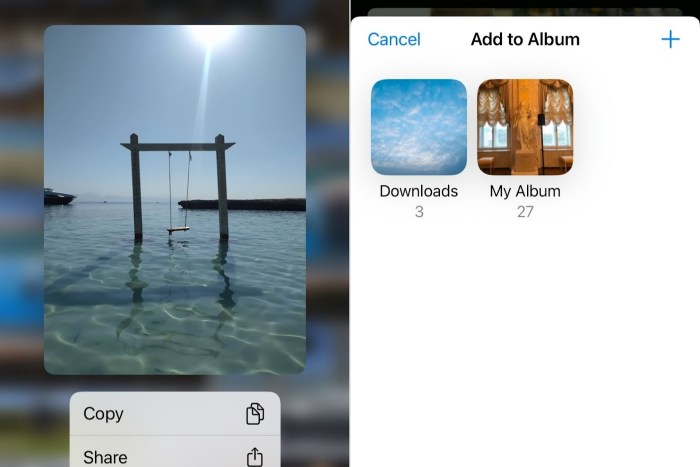
Let’s clear up one of the most common fears right away – no, when you move photos into albums on your iPhone it does not create duplicates. You’re not making a new file. You’re simply tell your iPhone, “Hey, also show this photo in this album.” Think of albums as playlists for your photos – the same song (or in this case, photo) can show up in multiple playlists without taking any extra space.
So, when you move a photo into a custom album, you’re safe. Your storage won’t magically shrink, and you won’t be stuck with the same photo in two or three versions. Albums are simply collections pointing to the original photo that still lives in your main library. Delete the photo from this library, and it disappears from the album too.
So, the answer to how to move photos to an album without duplicating is simple – tap on a picture, select Add to Album, and that’s it. No new copies, no extra clutter.
How to Organize Photos on iPhone Without Duplicates
While you can’t create duplicates just by moving photos into albums, there are still plenty of ways we all end up with them anyway. Maybe you saved the same picture from a text message two or three times. Or you imported photos from your computer, cloud, or another app, only to find you already had them in your library. Don’t worry – later in this article, we’ll talk about how to prevent this mess going forward. But first, let’s deal with the duplicates you already have.
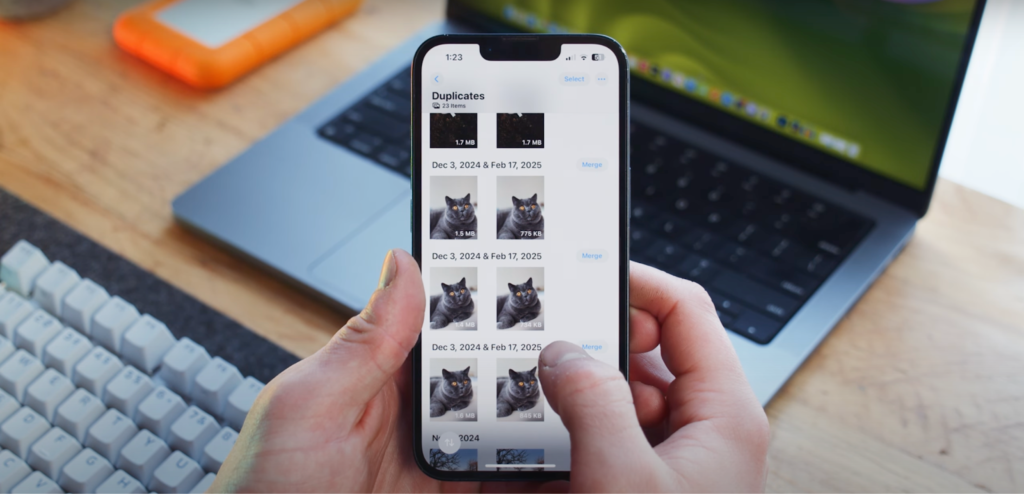
You might have already spotted the “Duplicates” album hiding inside the Utilities section of the Photos app. Apple slipped this feature into the system in the iOS 16 update, and it’s honestly pretty helpful. It automatically scans your library and gathers photos that are exact matches, letting you “Merge” them into one clean copy. You can see how it works in Apple’s official guide here.
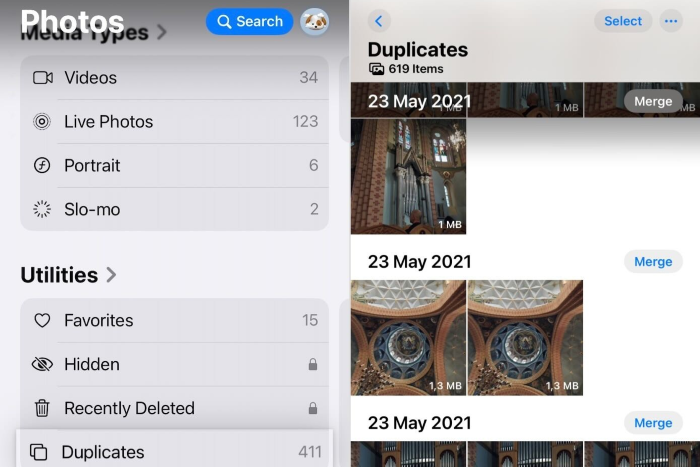
But – and it’s a big but – the Duplicates album only works when the photos are identical. So if you have two photos that look the same to you – like you snapped three versions of your dog sleeping and only the shadows are slightly different – this tool won’t catch them. They’ll slip past.
Also, many iPhone users (us included) noticed that sometimes the Duplicates album doesn’t even show up right away. Your phone needs time to index your library, especially if you have thousands of photos. People have even vented about this in Reddit threads, some had to wait hours (or even a whole day) before duplicates appeared. Not ideal when you’re ready for a cleanup now.
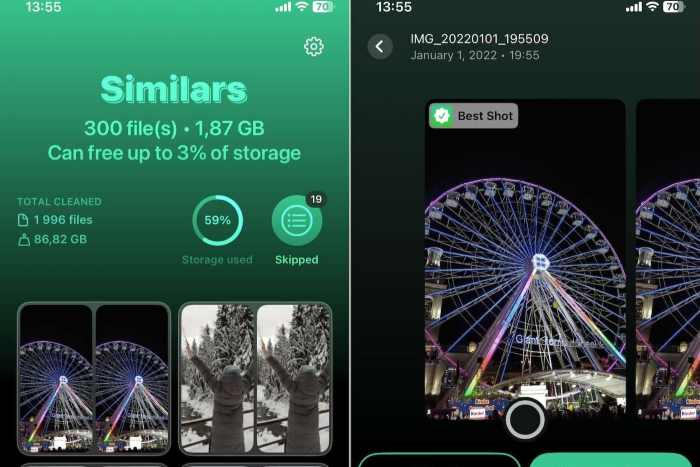
That’s exactly why many end up turning to third-party apps. The one we picked for this demonstration is a completely free app called Clever Cleaner. It caught our attention not just because it’s 100% free – no trials, no ads, no locked features – but because it’s very accurate. It uses AI to spot similar images and seems to have pretty sophisticated algorithms, which rival what you usually find behind a paywall.
So, let’s see how it works in practice:
- First, download Clever Cleaner: AI CleanUp App from the App Store, open it and give it permission to access your photos.
- Next, head over to the Similars tab.
- At the bottom, you’ll spot a button called Smart Cleanup. Tap it, and the app will automatically clean your library from duplicates or near-duplicates.
- If you see a photo you don’t want to part with, simply tap Restore. Otherwise, swipe to delete and confirm the cleanup when you’re ready.
In just a few taps, you can remove duplicates and similar photos without breaking a sweat.
And if you’re more of a hands-on type? You can go group by group and decide exactly what stays and what goes. Even when doing it manually, the app helps out by automatically picking what it thinks is the “Best Shot.” Sure, you can swap it out if you disagree – but honestly, we’ve found it’s pretty spot-on most of the time.
Once you finish your cleanup, don’t forget (and the app will kindly remind you) to clear out your Recently Deleted album to free up the space for good.
Oh, and if you want to explore even more ways to organize photos on iphone without duplicates, or check out other apps that can help – you can learn more about it here: https://www.cleverfiles.com/howto/remove-duplicate-photos-iphone.html
Video Guide
What is the Easiest Way to Organize Photos on an iPhone?
The next step, once you’ve gotten rid of all those sneaky duplicates, is to neatly organize everything you’ve got left. This is the fun part.
While there isn’t one universal, easiest way to organize photos on an iPhone, there are a few pretty simple ones that most people swear by. Let’s count them.
1. Custom Albums
Custom albums are the backbone of any tidy photo library. They’re perfect if you love organizing things your way – vacations, food experiments, or that one summer where every weekend turned into a photo shoot.
- Just open the Photos app.
- Tap on Albums.
- Hit the little plus (+) button, and choose New Album.
- Give it a name – something more fun than just Trip 2025, like Sunburn & Gelato if you’re feeling creative – and hit Save.
- Then, select the photos you want and drop them into the album.
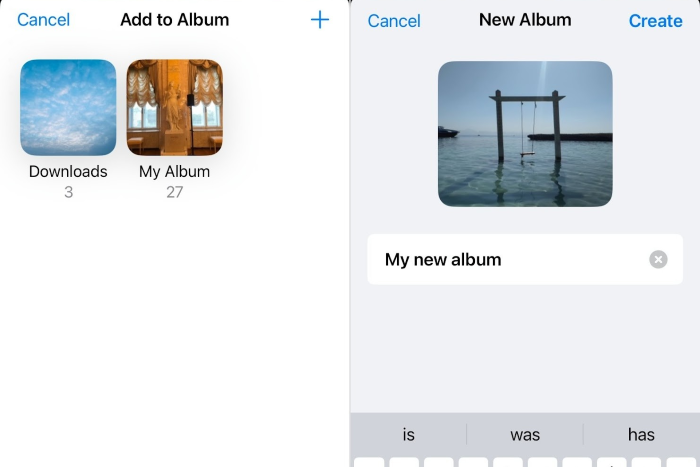
Remember, like we mentioned earlier, you’re not duplicating anything. You’re simply grouping them. The photos stay in the main library, and the album works more like a shortcut to them.
2. Favorites Album
The Favorites album is one of those hidden gems that people forget about – but it can make your life so much easier. Think of it as your personal “best of” collection. Whenever you come across a photo you love, just tap that little heart icon underneath it. That’s it. The photo will automatically show up in the Favorites album.
No need to overthink it. Use it however you like – maybe for photos you show off all the time, or for the handful of shots you’d never want to lose track of.
To find your Favorites album later:
- Open the Photos app.
- Scroll down to the Utilities section, and you’ll spot Favorites right there among the default albums.
- Tap it, and you’ll instantly see all the photos you’ve marked with a heart.
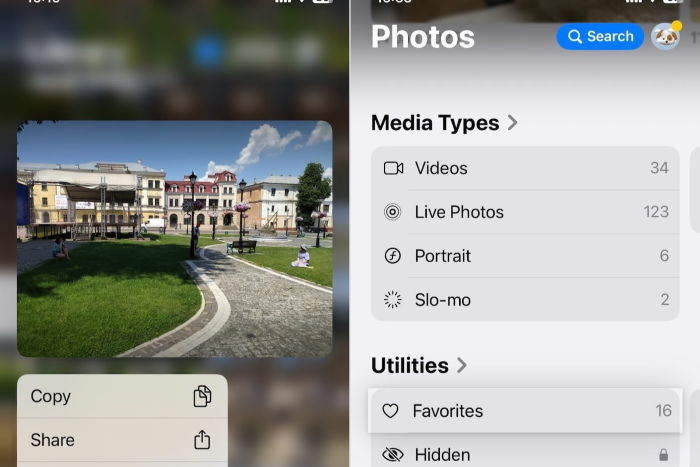
It’s fast and you can fill it up as you go. Then, whenever you want a quick scroll through the highlights, you’ll have them all waiting for you, neatly gathered without having to search through the entire camera roll.
3. Hidden Album
We all have those photos we don’t exactly want showing up during casual scrolling – whether it’s a surprise gift you snapped, a screenshot of a password, or just something you’d rather keep private. That’s where the Hidden album comes in handy.
Here’s how to hide a photo:
- Open the photo, tap the three-dot menu (top-right corner)
- Select Hide. The photo will quietly move out of your main gallery and into the Hidden album.
- To find your Hidden album scroll down to the Utilities section, and there it is – Hidden.

Now, don’t expect bank-level security here. This album isn’t locked by default. But if you want to make it more secure, you can head into Settings → Photos and toggle on Use Face ID (or Touch ID) to lock it up.
It’s a small but useful feature to keep certain photos from popping up unexpectedly when you’re showing someone your vacation pics and accidentally swipe a little too far.
4. People, Pets & Places Albums
This one feels a bit like magic when you first discover it. Your iPhone actually sorts photos automatically based on people, pets, and locations – and it does a pretty decent job too. If you’ve ever wondered how your phone somehow knows that’s your best friend or your dog, it’s thanks to Apple’s built-in face and object recognition.
- Open the Photos app.
- Scroll down to the People, Pets & Places section, and you’ll see albums already created for you.
- Tap on People and you’ll find grouped faces of the folks you photograph the most.
- You can even name them. Tap a face, hit Add Name, and from then on, every time you snap a picture of that person, your iPhone will quietly drop it into their album.
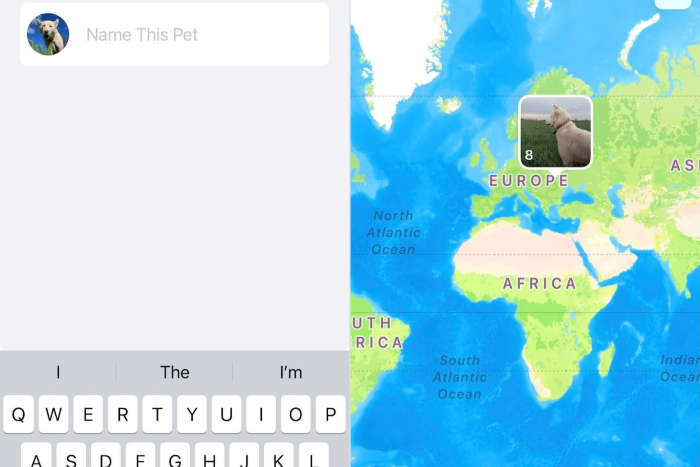
It works the same way for pets – yes, your phone can actually tell the difference between your cat and your neighbor’s. And then there’s Places, which lays out your photos on a map. Zoom into any location and see all the pictures you took there.
No duplicates are created here either. These smart albums are just clever ways to browse your existing photos.
How to Stop Duplicate Photos on iPhone
And now, as we promised, let’s talk about prevention. You already know how to neatly organize photos in your gallery, but the real question is – how do you stop duplicates from showing up again? After all, it’s easier to avoid the mess than to clean it up later.
In our experience, there are a few common situations you need to watch out for:
- First thing – pay attention when you import photos. Syncing from multiple places like iCloud, a Mac, or an external drive often brings the same photos in more than once without you even noticing.
- Another thing that might create duplicates is editing. When you crop, apply filters or make some other adjustments, your iPhone often saves a new copy instead of updating the original. That’s how you end up with both the original and the edited version side by side.
- Also, be careful when you send photos between devices using AirDrop or third-party apps. Sending the same batch twice (we’ve all been there) will quietly duplicate them in your library.
- Live Photos can trick you too. If you convert a Live Photo to a still image, your iPhone saves it as a brand-new file but keeps the animated version as well. At a glance, they’ll look identical, but technically, they’re two different photos.
- Lastly, be careful when you save photos from messages, emails, or social media. It’s easy to forget you already saved that cute pet picture your friend sent, so you tap “Save” again – and there’s your duplicate.
Final Words
So the trick? Stay mindful. It’s not about turning into a photo-organizing perfectionist – you won’t catch 100% of duplicate cases, and that’s perfectly fine. The good news is, with all the built-in features we covered, plus third-party cleaners that can automate most of the work for you, keeping your library tidy isn’t a big deal anymore.
All you really need to organize photos is a quick cleanup every now and then. Do it once in a while, and you’ll avoid the chaos. Your photo library will stay organized, light, and actually fun to browse.

: What They Are and How They Work in the Grails Framework")


